Nano Banana Best Prompts: The Complete Guide to AI Image Generation Mastery
Master Nano Banana (Gemini 2.5 Flash Image) with proven prompt techniques. Learn the 6-element framework, 50+ example prompts, and advanced strategies for stunning AI-generated images.
Nano Banana Pro
4K图像官方2折Google Gemini 3 Pro Image · AI图像生成
已服务 10万+ 开发者
Why Your AI Images Keep Disappointing You
The image you imagined looked stunning in your mind. A dramatic portrait with cinematic lighting. A product photo that could grace any e-commerce site. A character design for your creative project. But when you typed your prompt into Nano Banana and hit generate, the result was... wrong. Generic lighting. Awkward composition. Missing details you thought you specified clearly. You're not alone in this frustration, and the solution isn't switching to a different AI model—it's learning how to communicate with the one you have.
This disconnect between vision and result frustrates thousands of creators daily. Social media feeds overflow with stunning AI-generated images while your attempts produce something that barely resembles what you intended. The difference isn't luck or having a "special touch"—it's technique. The creators producing consistently impressive results have learned specific patterns for communicating with AI image models, and these patterns are entirely learnable.
Nano Banana, Google's codename for the Gemini 2.5 Flash Image model, represents a significant leap in AI image generation capabilities. Unlike earlier models constrained by 77-token CLIP encoders, Nano Banana processes prompts through Gemini's 32,768-token context window. This means you can write rich, detailed descriptions rather than cramming keywords into a tiny box. The model understands complex scenes, interprets artistic directions, renders text with impressive clarity, and responds to conversational refinement. But these capabilities only manifest when you know how to prompt effectively.
This guide teaches you the principles behind great Nano Banana prompts, not just copy-paste examples. You'll learn a systematic framework for constructing prompts that consistently produce the results you envision. By the end, you'll understand why certain prompts work better than others and be able to create your own prompts for any scenario you encounter.
The Fundamental Principle: Describe Scenes, Not Keywords
The single most common prompting mistake carries over from older image generation models. Early systems like CLIP-based generators performed best with comma-separated keyword lists: "portrait, woman, dramatic lighting, 8K, trending on artstation." Users developed habits around this keyword-stuffing approach, and many carried those habits into Nano Banana without questioning whether they still applied.
They don't. Nano Banana's architecture fundamentally differs from earlier models. Built on Gemini's large language model backbone, it processes prompts as natural language rather than extracting keywords from a limited token window. A narrative, descriptive paragraph produces more coherent images than a list of disconnected terms because the model understands relationships between concepts, temporal sequences in actions, and spatial arrangements in scenes.
Consider the difference between these two approaches for generating a coffee shop interior:
Weak Prompt (Keyword List):
cozy coffee shop, warm lighting, wooden tables, plants, vintage, morning, people, steam, 4K, photorealistic
Strong Prompt (Scene Description):
The interior of a neighborhood coffee shop during the quiet morning hours before
the rush begins. Warm sunlight streams through tall windows, casting long shadows
across worn wooden tables. A barista in a dark apron arranges pastries behind a
glass case while a single customer reads near the window, steam rising from their
cup. Potted ferns hang from the ceiling, and vintage coffee advertisements line
the exposed brick walls. The atmosphere is calm and inviting.
The keyword version might produce something vaguely coffee-shop-like, but the composition will be arbitrary and the mood inconsistent. The descriptive version gives Nano Banana enough context to make coherent decisions about every element—where the light comes from, how objects relate to each other, what feeling the scene should evoke.
This doesn't mean you should write novels for every prompt. Sometimes simple prompts work fine. But when results disappoint you, the first question to ask is whether you described a scene or just listed attributes you want to see.
The 6-Element Prompt Framework
Rather than memorizing hundreds of example prompts, learn the six elements that comprise effective Nano Banana prompts. When your results fall short, check which elements you might be missing or could strengthen. This framework applies whether you're generating portraits, products, landscapes, or abstract designs.
Element 1: Subject Define who or what appears in the image. Be specific about details that matter to your vision. "A woman" gives the model complete freedom; "a woman in her 60s with silver hair and gentle smile lines" constrains the output toward your intention. Include clothing, accessories, and physical characteristics when relevant.
Element 2: Composition Specify how the camera frames the subject. Photography and cinematography terminology works well here: close-up, medium shot, wide angle, low angle, Dutch angle, over-the-shoulder, rule of thirds positioning. The model responds well to explicit framing directions because it was trained on enormous datasets of professionally composed images with associated descriptions.
Element 3: Action Describe what's happening in the scene. Static subjects often look flat; even subtle actions like "gazing thoughtfully at the horizon" or "carefully examining a document" add life. For dynamic scenes, describe the moment you want to capture: "mid-stride while running through rain" specifies a particular instant rather than a generic running pose.
Element 4: Environment Set the stage with location and context. Indoor scenes benefit from architectural details, furniture, and ambient elements. Outdoor scenes need weather, time of day, and geographic characteristics. Even studio-style portraits benefit from specifying "against a clean white backdrop" rather than leaving background to chance.
Element 5: Style Guide the aesthetic approach. This includes artistic movements (impressionist, art deco, brutalist), media types (oil painting, watercolor, 3D render, photograph), and cultural references (Ghibli-style, 90s anime, Wes Anderson color palette). Style elements can be combined, but excessive stacking sometimes produces muddy results.
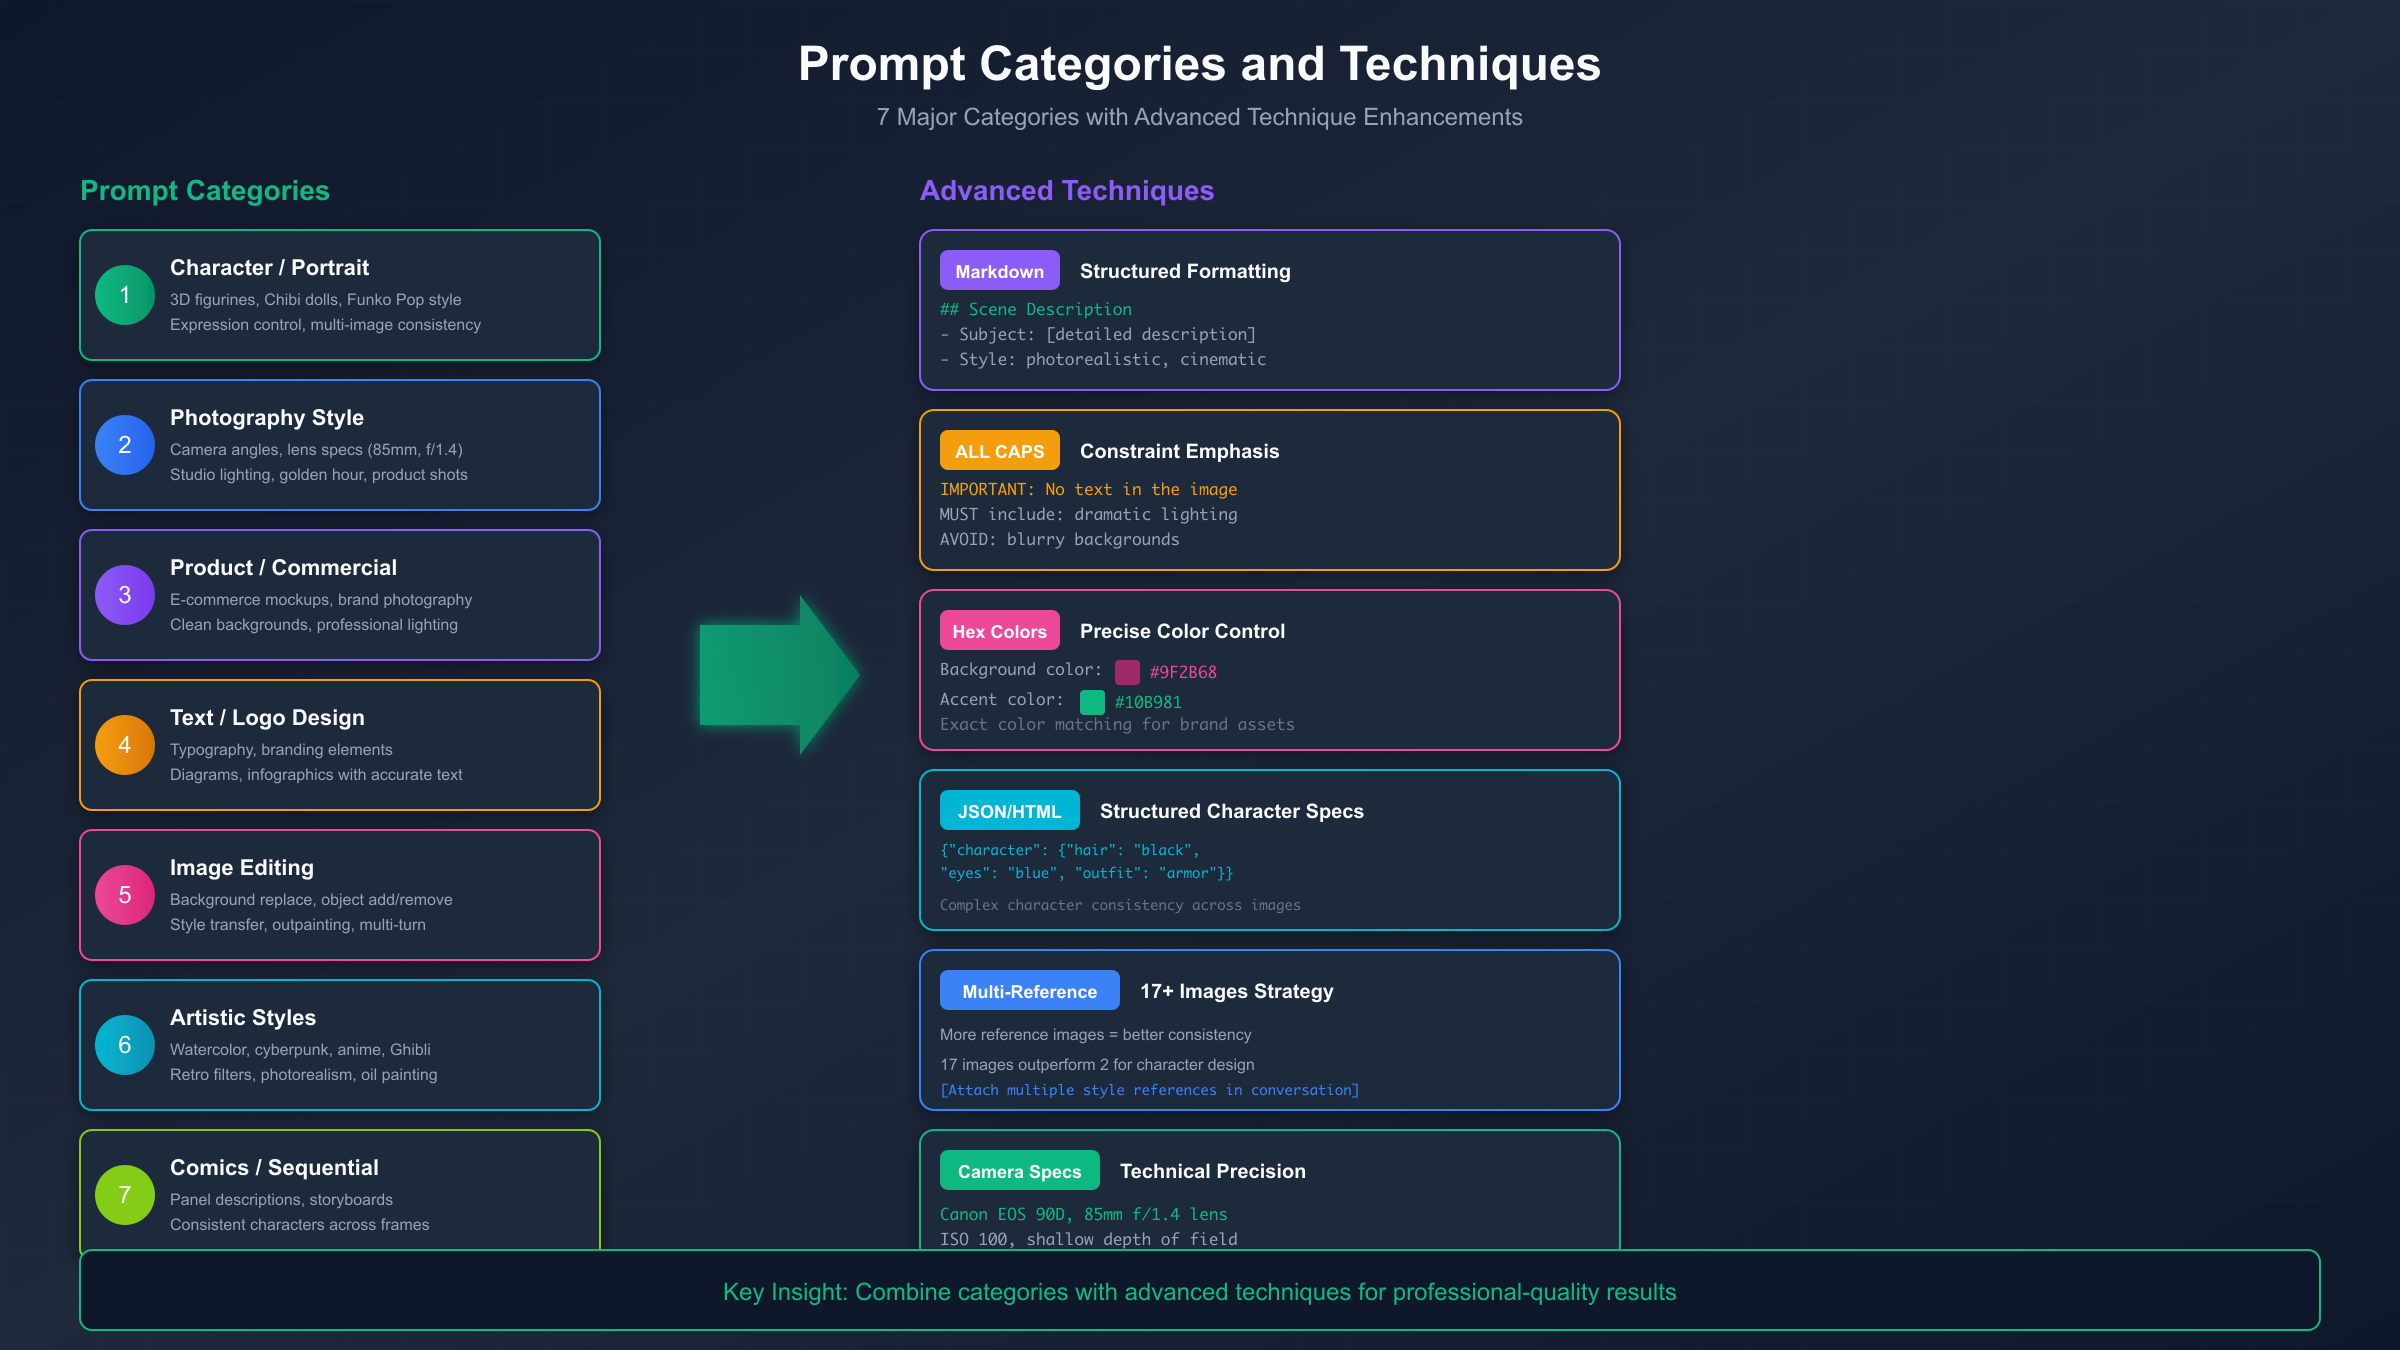
Element 6: Technical Specifications Add camera and lighting details for photorealistic work. Lens specifications (85mm portrait lens, 24mm wide angle), lighting setups (soft box, golden hour, dramatic rim lighting), and camera models (when you want specific color science or film grain) all influence output. For non-photographic styles, specify resolution, color palette (including hex codes like #9F2B68 for precise colors), and rendering quality.
Here's the framework applied to a product photography prompt:
Subject: A minimalist ceramic coffee mug in matte sage green with a curved handle
Composition: 45-degree angle, slightly above eye level, subject fills 60% of frame
Action: Steam rising gently from the surface of black coffee inside
Environment: Clean white marble countertop, soft morning light from a nearby window
Style: Commercial product photography, editorial magazine aesthetic
Technical: Canon R5, 100mm macro lens, f/2.8 for subtle bokeh, color-accurate daylight
The combined prompt reads naturally as a paragraph while ensuring you've addressed every element that contributes to a successful image.
Mastering Photography-Style Prompts
When you want photorealistic results, thinking like a photographer dramatically improves outcomes. Every decision a photographer makes—lens selection, lighting setup, camera position, moment of capture—can be communicated to Nano Banana. The model learned from millions of photos with detailed metadata and descriptions, so it responds well to photographic vocabulary.
Lens specifications carry meaningful implications for the image. An 85mm portrait lens suggests shallow depth of field and flattering facial proportions. A 24mm wide angle implies environmental context with potential edge distortion. A 200mm telephoto compresses perspective, making backgrounds appear closer. Macro lenses signal extreme close-up with fine detail rendering. You don't need to be technically accurate about exactly which lens produces which effect—the model interprets these as stylistic signals rather than literal optical calculations.
Lighting descriptions deserve particular attention because lighting defines mood more than almost any other factor. "Natural daylight" produces different results than "overcast diffused light" or "harsh midday sun." Studio lighting terminology works too: "two-point lighting with soft key and strong fill" or "single dramatic side light with deep shadows." For portraits, "Rembrandt lighting" (a specific technique producing a triangular highlight on the shadowed cheek) communicates a recognized pattern the model can replicate.
Camera angles establish the relationship between viewer and subject. Low angles looking up convey power or dominance. High angles looking down suggest vulnerability or overview perspective. Eye-level angles feel neutral and natural. Dutch angles (tilted horizon) add tension or unease. Specify these explicitly when the default eye-level perspective doesn't serve your vision.
Here's a portrait prompt incorporating photography principles:
A photorealistic close-up portrait of a jazz musician in his 50s, photographed
during a live performance. His eyes are closed in concentration as he plays
saxophone, face illuminated by warm stage lighting from above and to the left.
Shallow depth of field blurs the dark venue background into soft bokeh. Sweat
glistens on his forehead, catching the light. Shot at f/1.8, capturing the
intensity and passion of the moment. The mood is intimate despite the public
setting, as if we're witnessing a private communion with music.
Notice how the prompt describes not just what appears in the image but how it should feel to view it.
Time of Day and Weather Specifications
Environmental conditions dramatically affect the mood and technical characteristics of generated images. Consider how different times of day create entirely different atmospheres:
- Golden hour (early morning or late afternoon): Warm, directional light with long shadows. Perfect for portraits and landscapes where you want emotional warmth and dimensionality.
- Blue hour (just before sunrise or after sunset): Cool, diffused ambient light with a magical quality. Ideal for moody, contemplative scenes.
- Midday: Harsh overhead light creating strong shadows. Generally unflattering for portraits but excellent for high-contrast architectural shots.
- Overcast: Soft, even light without harsh shadows. Natural softbox effect that works well for product photography and natural portraits.
Weather elements add another dimension of atmosphere and drama. Describing "rain-slicked streets reflecting neon signs" creates a completely different visual experience than "dusty afternoon sunlight filtering through haze." Be specific about weather conditions when they contribute to your vision.
Character and Figure Generation
Nano Banana excels at generating characters in various styles, from photorealistic portraits to stylized figures like 3D action figures, Funko Pop collectibles, and anime characters. The key to consistent character generation lies in specific, constrained descriptions that leave less room for random variation.
For 3D figurine and collectible styles, describe both the character and the object characteristics:
A collectible 3D figurine of a cyberpunk street vendor, approximately 6 inches
tall on a circular black display base. The figure is rendered in high-quality
PVC plastic with glossy finish on the jacket and matte texture on the fabric
elements. The character wears a neon-lit face mask, layered tactical clothing,
and carries a holographic display case of tech gadgets. Clean studio lighting
on neutral gray backdrop, product photography style suitable for an online
collectibles catalog.
The Funko Pop aesthetic has specific conventions: oversized head, small body, black dot eyes, minimal facial features. Mentioning these conventions helps the model match the style:
A Funko Pop style vinyl figure of a medieval blacksmith. Oversized square head
with the characteristic large black dot eyes and no other facial features.
Small body with simplified hands holding a tiny hammer. Wearing a brown leather
apron over peasant clothes. The figure stands on a typical Funko display base.
Rendered as an official product photo with clean white background.
For character consistency across multiple images, research indicates that providing more reference images produces better results than fewer. If you have existing character images, uploading multiple angles (front, side, three-quarter view) helps the model understand the character's features comprehensively. In the prompt, use phrases like "the same character" or "maintaining identical facial features" when generating variations.
Anime and manga styles require specifying the sub-genre, as visual conventions vary dramatically. "90s anime style with cel shading and detailed mechanical designs" produces very different results than "modern moe style with soft shading and rounded features." Include era, studio references (Ghibli, Trigger, Madhouse), or specific show titles to narrow the aesthetic.
Expression and Emotion Control
Facial expressions and body language communicate character personality and mood. Rather than using single-word descriptors like "happy" or "sad," describe the specific physical manifestations:
Instead of "happy expression," try: "a genuine smile that crinkles the corners of her eyes, head slightly tilted with relaxed shoulders suggesting comfort and warmth."
Instead of "angry expression," try: "jaw clenched with visible tension, brows drawn together creating a deep furrow, eyes narrowed with intense focus, posture leaning forward aggressively."
This level of specificity gives Nano Banana the information needed to create nuanced, believable expressions rather than generic emotional templates.
Maintaining Character Consistency Across Multiple Images
One of the most challenging aspects of AI image generation is producing consistent characters across multiple images. Whether you're creating a character for a game, comic, or marketing campaign, you need the same person to be recognizable in different poses, outfits, and settings.
The most effective approach combines detailed initial descriptions with multi-image referencing. First, generate several images of your character from different angles, selecting the ones that best match your vision. Then use these approved images as references when generating new variations, explicitly instructing the model to "maintain identical facial features, skin tone, and distinctive characteristics from the reference images."
Document your character's specifications in a reusable format:
Character: Maya Chen
Physical: East Asian woman, late 20s, athletic build, 5'7"
Face: Oval face, almond-shaped brown eyes, straight nose, full lips
Hair: Black, shoulder-length, usually worn in a ponytail
Distinguishing features: Small mole above right eyebrow, determined expression
Default outfit: Gray hoodie, dark jeans, white sneakers
Reference this specification when generating new images, and the consistency dramatically improves.
Text and Logo Design: Nano Banana's Hidden Strength
One of Nano Banana's most underappreciated capabilities is text rendering. While many AI image generators struggle with legible text (producing garbled letters or inconsistent fonts), Nano Banana handles typography remarkably well. This makes it valuable for logo design, poster creation, infographics, and any application where text must appear clearly within images.
The key to clean text rendering is explicit specification. Don't just mention that text should appear—describe exactly what it should say, how it should be styled, and where it should be positioned. Font category (serif, sans-serif, script, display), weight (light, regular, bold, black), and style (italic, condensed, extended) all influence output. If you want specific font characteristics, describe them: "clean geometric sans-serif similar to Futura" or "elegant serif with high contrast similar to Didot."
Here's a prompt for logo design that demonstrates text handling:
A modern minimalist logo for a sustainable coffee company called "Evergreen Roast."
The text uses a clean, bold sans-serif font with generous letter spacing. The word
"Evergreen" appears above "Roast" in a slightly smaller size. A simple stylized
coffee leaf icon sits to the left of the text, using only two colors: deep forest
green (#1B4D3E) and cream white (#F5F5DC). The design is balanced and suitable for
both large signage and small favicon applications. Clean white background, vector
art style suitable for commercial use.
For diagrams and infographics, Nano Banana can generate layouts with labeled components:
A clean infographic showing the coffee brewing process in 5 steps, arranged
horizontally from left to right. Each step has a simple icon above and short
label below: "1. Grind Beans" with coffee grinder icon, "2. Heat Water" with
kettle icon, "3. Add Grounds" with filter basket icon, "4. Pour Water" with
kettle pouring icon, "5. Enjoy" with steaming cup icon. Use a warm color palette
of browns and creams. Modern flat design style with subtle shadows. Labels in
clean sans-serif font at 16pt equivalent size.
When text doesn't render perfectly on the first attempt, use conversational editing to refine: "Make the text 'Evergreen' more legible" or "Increase the spacing between letters in the bottom text." Iterative refinement often produces cleaner results than trying to get everything perfect in a single prompt.
Social Media Graphics and Marketing Materials
Nano Banana's text capabilities make it particularly effective for creating social media graphics that would traditionally require design software. For Instagram posts, LinkedIn banners, or Twitter cards, describe both the visual elements and the text requirements:
A professional LinkedIn banner for a marketing consultant. Clean, modern design
with a subtle gradient from dark blue (#1e3a5f) to navy (#0a1929). The text
"Strategic Growth Partner" appears in white, bold sans-serif, centered in the
upper third. Below in smaller text: "Helping B2B Companies Scale." Leave the
right third of the banner relatively empty for profile photo overlay. Subtle
abstract network pattern in the background suggesting connections and strategy.
For quote graphics, testimonial images, and other text-heavy social content, specify exact wording, font hierarchy, and how text should interact with visual elements. The more precise your text specifications, the closer you'll get to usable output on the first generation.
Poster and Print Design Considerations
When generating images for print applications, resolution and aspect ratio specifications become critical. Nano Banana can generate at various resolutions—be explicit about output dimensions and always work at higher resolution than you think you'll need, as you can downsize but not effectively upsize. For print materials, specify at least 300 DPI equivalent resolution.
Describe bleed areas and safe zones for content if your design will be professionally printed:
Create a movie-style poster for a thriller film titled "The Last Algorithm."
Portrait orientation 18x24 inches at high resolution. Main image shows a
shadowy figure silhouetted against a wall of glowing code. Title text at top
in distressed metallic font. Keep critical elements at least 0.5 inches from
edges to allow for print bleed. Dark, moody color palette with accent of
electric blue from the code screens.
Image Editing and Transformation Workflows
Nano Banana isn't just a text-to-image generator—it's also a sophisticated image editor. By uploading existing images alongside text prompts, you can add elements, remove objects, change backgrounds, apply style transfers, and make targeted modifications while preserving aspects you want to keep.
The editing workflow follows a simple pattern: upload the source image, then describe what changes you want. Be explicit about what should change and what should remain the same:
Change the background of this portrait from the current indoor setting to a
sunset beach scene. Keep the subject's face, expression, hair, and clothing
exactly as they appear. Match the lighting on the subject to the warm golden
light of the sunset. Add subtle orange rim lighting around the subject's shoulders
to integrate them naturally with the new environment.
For object addition, describe both the object and how it should integrate:
Add a vintage leather satchel to the subject's left shoulder. The bag should be
worn brown leather with brass buckles, slightly weathered. Position it so the
strap crosses the chest naturally. The lighting and shadow on the bag should
match the existing lighting in the scene—soft and directional from the upper right.
Object removal works similarly, though you should describe what should fill the space:
Remove the person standing in the background behind the main subject. Fill
the area naturally with the same brick wall texture visible elsewhere in the
scene, maintaining consistent lighting and shadow patterns.
Style transfer transforms images into different artistic styles. Research indicates that creating new images in a style works more reliably than transforming existing photos, but editing approaches can still produce interesting results:
Transform this portrait photograph into a Studio Ghibli-style illustration.
Maintain the subject's facial proportions, pose, and expression. Apply soft
watercolor textures, gentle gradients, and the characteristic Ghibli color
palette with muted greens and warm earth tones. Add subtle environmental
details like floating dust motes catching the light.
For developers and power users, API access enables programmatic editing workflows. Services like laozhang.ai provide Nano Banana API access at approximately $0.025 per image, making it practical to build applications that perform automated image editing tasks. The API accepts the same prompts you'd use interactively, with base64-encoded images for the editing context.
Outpainting extends images beyond their original boundaries. Upload the source image and request expansion:
Extend this portrait photograph to show more of the room environment. Expand
the canvas 50% to the left and right. Fill the new areas with consistent
interior design: warm wooden furniture, soft natural light from windows,
potted plants. Maintain the same color temperature and photographic style
as the original image.
Batch Editing Workflows
When you need to apply similar edits to multiple images—like standardizing backgrounds across a product line or applying consistent color grading to a photo series—develop template prompts that you can reuse. A well-structured editing template might look like:
EDITING TEMPLATE: Product Background Standardization

For each uploaded product image:
1. Remove the existing background completely
2. Replace with a pure white (#FFFFFF) studio background
3. Add subtle soft shadow beneath the product, falling to the lower right
4. Maintain all product details exactly as they appear
5. Ensure consistent lighting that matches a 3-point studio setup
6. Output at original resolution
Using consistent templates ensures uniform results across your image set, which is essential for professional e-commerce presentations and catalog work.
Multi-Turn Editing Sessions
Complex edits often require multiple rounds of refinement. Nano Banana's conversational capabilities allow you to build on previous results rather than starting fresh:
- Round 1: "Remove the background and replace with a modern office interior"
- Round 2: "The lighting on the subject doesn't match the background. Adjust it to match the overhead fluorescent lighting in the office"
- Round 3: "Add a subtle reflection of the subject in the glass desk surface"
- Round 4: "Warm up the overall color temperature slightly—it feels too cool"
Each refinement builds on the previous result, allowing precise control that would be difficult to specify in a single prompt.
Advanced Prompting Techniques
Power users have discovered several techniques that push Nano Banana's capabilities beyond straightforward prompting. These advanced methods leverage the model's training on diverse data formats and its sensitivity to formatting cues.
Markdown Formatting for Complex Prompts
The model responds well to structured Markdown because Gemini was trained extensively on code repositories and documentation. Use dashed lists to specify rules:
Create an image of a technology workspace with the following requirements:
- Dual monitors displaying code editors
- Mechanical keyboard with RGB lighting
- Houseplant in ceramic pot to the left
- Morning sunlight from a window behind
- Clean minimalist aesthetic
- NO clutter, papers, or food items
ALL CAPS for Constraint Emphasis
Capitalization significantly improves adherence to specific constraints. When something must appear or must NOT appear, capitalize for emphasis:
Create a professional headshot suitable for a corporate website.
The subject MUST be wearing a dark blazer.
The background MUST be solid light gray.
There MUST NOT be any text or logos visible.
Lighting should be soft and professional.
Hex Color Codes for Precision
Rather than describing colors in natural language (which can be interpreted variably), use specific hex codes:
A geometric abstract design using exactly three colors:
- Deep teal (#006D77)
- Warm coral (#E29578)
- Cream white (#FFDDD2)
The shapes should be clean triangles and circles with no gradients.
JSON Structured Prompts for Complex Characters
For detailed character specifications with many attributes, JSON format helps organize information:
Generate a character portrait based on these specifications:
{
  "name": "Elena Vasquez",
  "age": "early 30s",
  "ethnicity": "Latina",
  "hair": "dark brown, shoulder-length, slight wave",
  "eyes": "brown with gold flecks",
  "expression": "confident slight smile",
  "clothing": "navy blazer over white blouse",
  "accessories": "small gold earrings, minimal makeup",
  "pose": "three-quarter view, looking at camera",
  "lighting": "soft natural window light",
  "style": "professional LinkedIn portrait"
}
Multiple Reference Images
When you have existing images to reference, providing more images produces better consistency. Research shows that 17 reference images significantly outperform 2 images for character consistency. In the prompt, describe how references should be used:
Using the uploaded reference images of this character's face from multiple
angles, generate a new image of the same person in a different setting.
Maintain exact facial features, skin tone, and the small scar above the
left eyebrow visible in the references. New setting: sitting at a cafe
outdoor terrace, casual clothing, afternoon sunlight.
Negative Space and Composition Control
Explicitly requesting compositional elements improves results:
Create a hero image for a meditation app. The scene shows a serene mountain
lake at dawn with significant negative space in the upper third of the
image for text overlay. Mist rises gently from the water surface. The
composition follows the rule of thirds with the horizon on the lower third
line. Muted, calming color palette of soft blues and grays.
Combining Techniques for Professional Results
The most effective prompts often combine multiple advanced techniques. Here's an example that incorporates Markdown structure, specific constraints, hex colors, and camera specifications:
## Professional Headshot Requirements

Create a corporate headshot with the following specifications:

### Subject
- Professional woman in her 40s
- Confident, approachable expression
- Dark blazer over light blue blouse

### Technical Requirements
- MUST be shot-style portrait, shoulders up
- Background: solid neutral gray (#8B8B8B)
- Lighting: soft three-point studio setup
- Camera: equivalent to Canon 5D Mark IV, 85mm portrait lens, f/2.8

### Constraints
- NO visible jewelry except small stud earrings
- NO patterns or busy textures in clothing
- Expression: MUST be natural, not overly posed

### Output
- High resolution suitable for website and print
- Professional business aesthetic
This structured approach works particularly well for complex prompts where you need precise control over multiple elements. The model parses the structure and gives appropriate weight to different requirements.

Common Mistakes and How to Fix Them
Even experienced prompters encounter frustrating results. Understanding the most common mistakes helps you troubleshoot faster and waste fewer generation credits on misses.
Mistake 1: Keyword Listing Instead of Scene Description
The temptation to fall back on comma-separated keywords is strong, especially when you're trying to include many elements. But remember that Nano Banana processes natural language, not keyword extraction. When results look generic or lack coherence, rewrite your prompt as a paragraph describing a scene someone could photograph or paint.
Instead of: "portrait, woman, red hair, green eyes, freckles, sunset, golden hour, forest, 8K, bokeh, professional"
Write: "A portrait of a young woman with vibrant red hair and striking green eyes, a constellation of freckles across her nose and cheeks. She stands at the edge of a forest during golden hour, warm sunset light catching in her hair and casting a soft glow on her face. The background dissolves into creamy bokeh of blurred autumn foliage. Professional photography with shallow depth of field."
Mistake 2: Expecting Style Transfer to Work Like Generation
Nano Banana handles image editing and new image generation differently. Style transfer—applying an artistic style to an existing photograph—works less reliably than generating new images in a particular style. If you want a "Ghibli-style portrait," you'll often get better results generating from scratch with style specifications than uploading a photo and asking for transformation.
When style transfer is necessary, be very specific about what should change and what should remain. The more you constrain the transformation, the more likely you'll get usable results.
Mistake 3: Insufficient Iteration
Nano Banana supports conversational refinement, but many users give up after one or two attempts. The model's multi-turn capability means you can progressively improve results through dialogue:
- First prompt: Generate initial image
- "Make the lighting more dramatic with stronger contrast"
- "Shift the subject slightly to the left to improve composition"
- "The skin tone looks too saturated, please make it more natural"
Each refinement builds on the previous result. This iterative approach often produces better final images than trying to specify everything perfectly in a single prompt.
Mistake 4: Ignoring the Model's Strengths
Text rendering, precise color control, and compositional understanding are Nano Banana's strengths. Abstract concepts, highly unusual combinations, and requests that conflict with training data patterns are weaknesses. Play to the strengths: if you need precise text, use Nano Banana. If you need surreal abstract imagery that defies physical logic, you might get better results from other models designed for that purpose.
Mistake 5: Token Waste on Irrelevant Details
While Nano Banana's 32K context window is generous, prompts that ramble or include irrelevant information can actually hurt results. Every token you spend on unnecessary detail is a token not spent on useful specification. Keep prompts focused: include what matters for the image you want, omit what doesn't influence the visual output.
Mistake 6: Overloading Style References
Requesting too many conflicting styles in a single prompt produces muddled results. "Cyberpunk meets baroque meets minimalist Japanese aesthetic" forces the model to attempt incompatible visual languages. Choose one primary style and, at most, one secondary influence. If you want to explore multiple directions, generate separate images for each approach and evaluate which works best.
Mistake 7: Neglecting Aspect Ratio Specifications
Default generation produces square or slightly landscape images, which may not suit your use case. For Instagram stories, mobile wallpapers, or banner ads, explicitly specify the aspect ratio: "vertical 9:16 aspect ratio for mobile display" or "wide panoramic 21:9 format for website header." The model responds well to aspect ratio requests and will compose appropriately for the specified dimensions.
Mistake 8: Forgetting About Negative Prompting
While Nano Banana handles positive descriptions well, you can also specify what you don't want to appear. This is particularly useful for avoiding common unwanted elements:
A professional product photo of a leather wallet. Studio lighting on white
background. The wallet is closed, showing the front face with subtle
embossed logo. NO hands or fingers visible. NO price tags or labels.
NO reflections of the photographer. Clean, simple, e-commerce ready.
Negative specifications (using "NO" or "without") help the model avoid common additions that might clutter your intended composition.
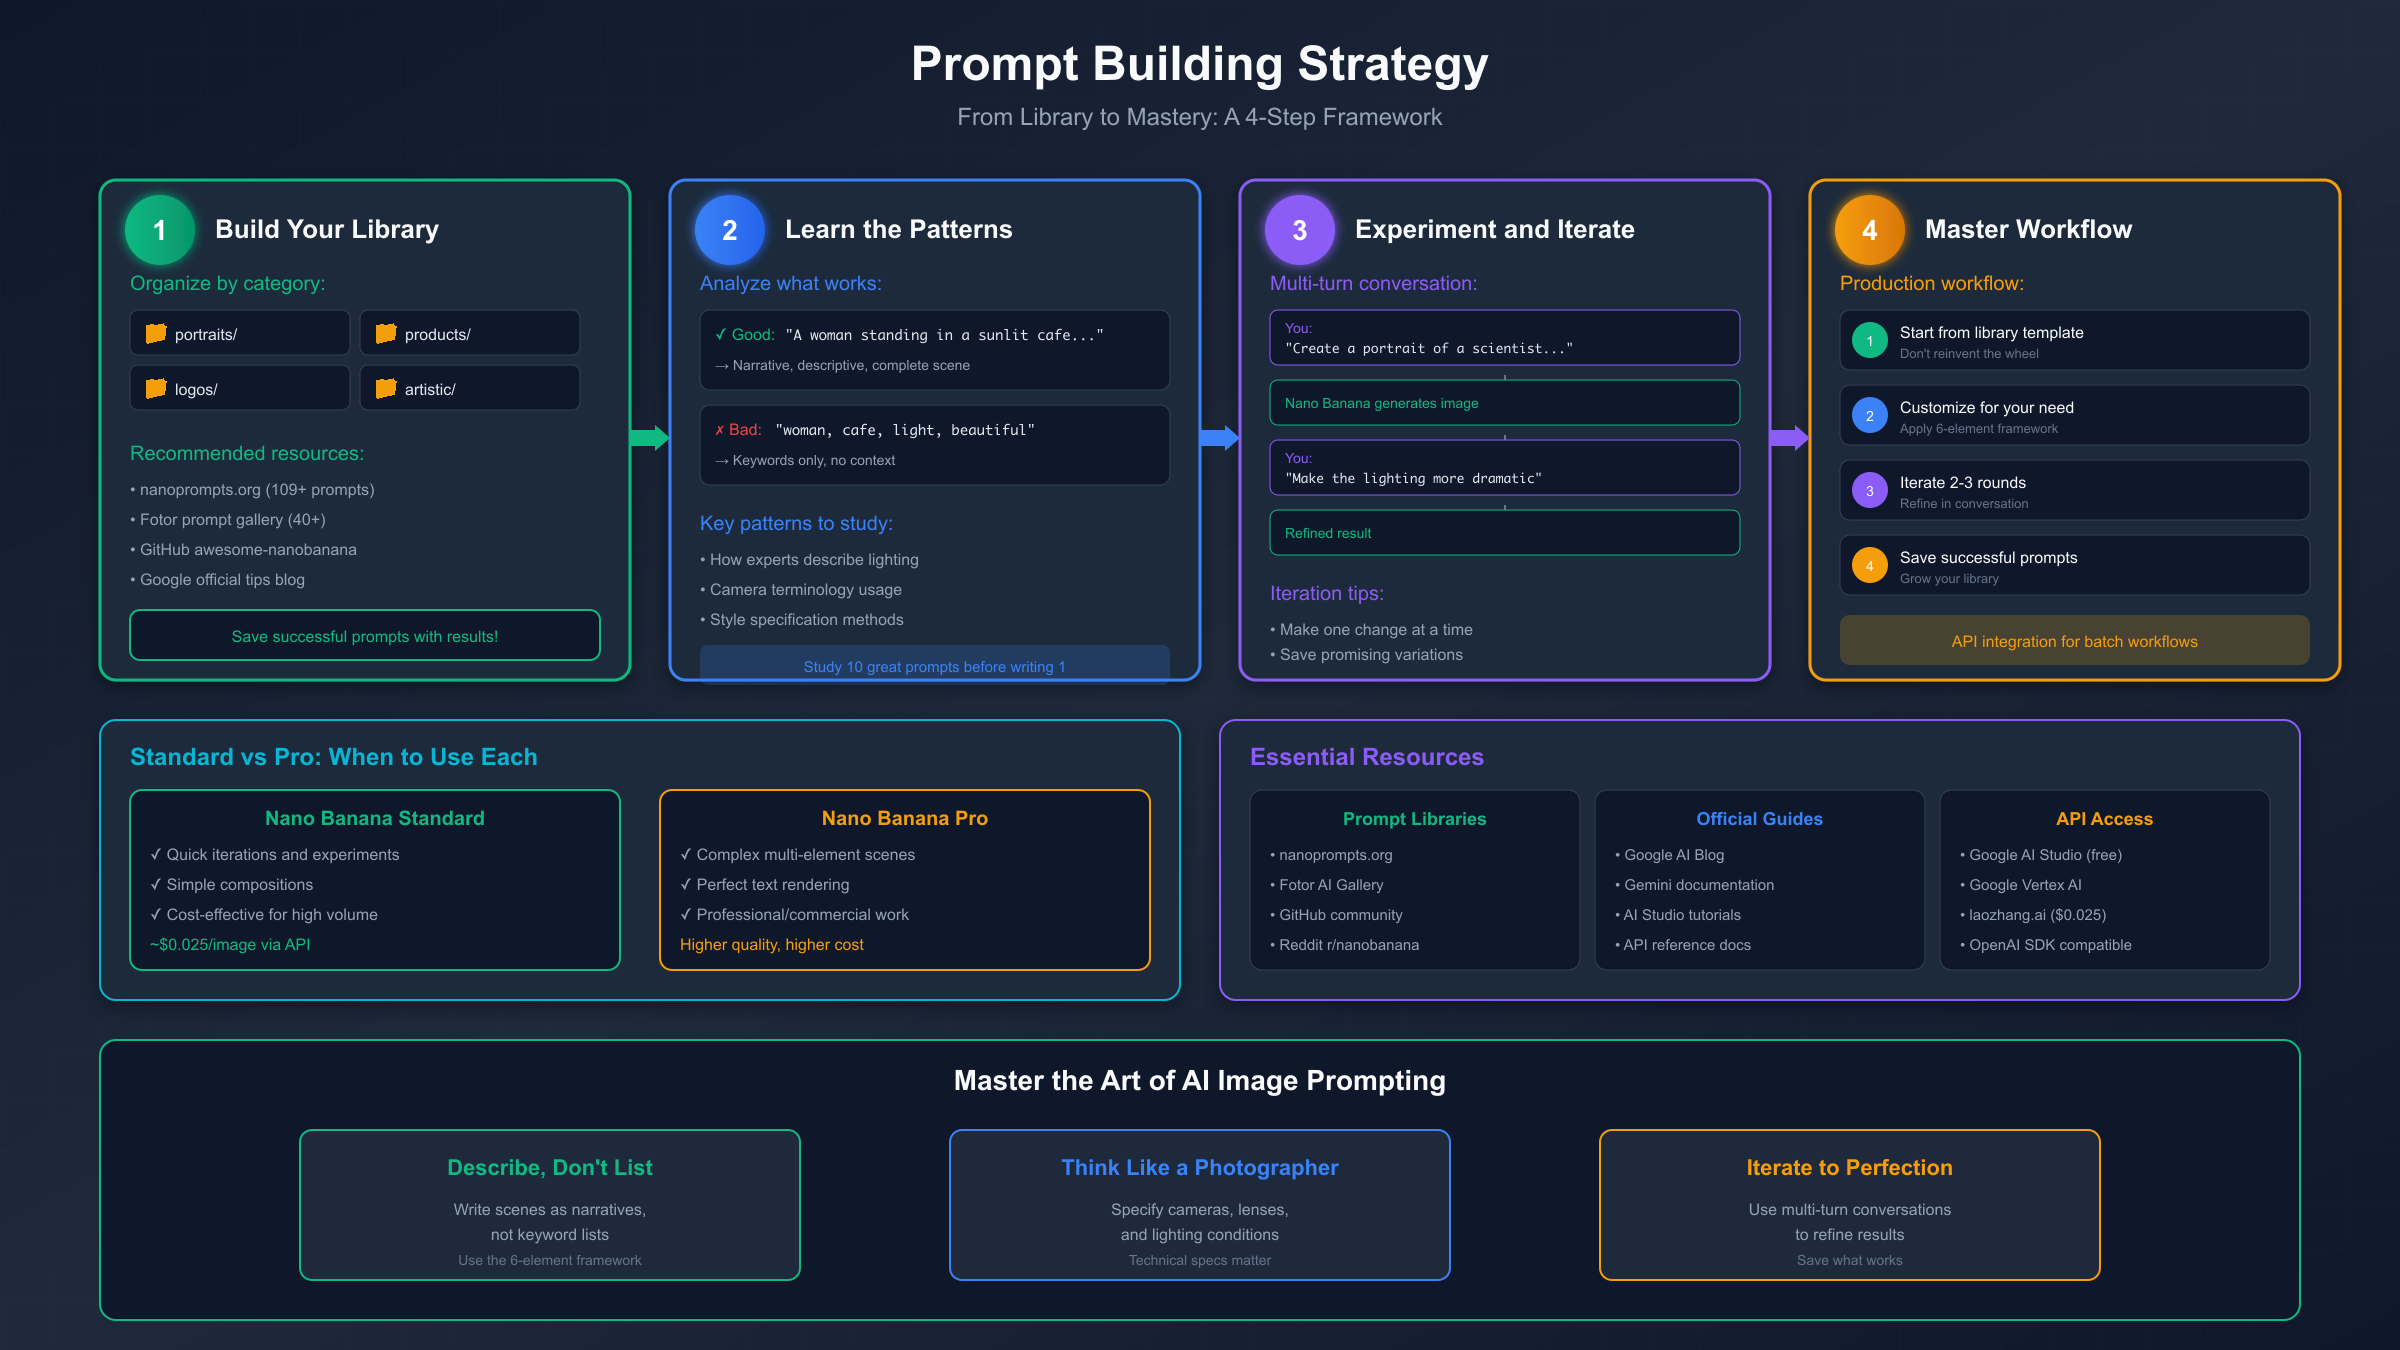
Nano Banana Pro vs Standard: When to Upgrade
Google offers two versions of the Nano Banana model: the standard Gemini 2.5 Flash Image and the enhanced Nano Banana Pro (built on Gemini 3). Understanding the differences helps you choose the right model for each task.
Standard Nano Banana (Gemini 2.5 Flash Image) is the default option, available free in limited quantities through Google AI Studio. It handles most use cases well: portrait photography, product shots, artistic styles, basic text rendering, and image editing. For learning and experimentation, the standard model provides excellent value.
Nano Banana Pro offers enhanced capabilities:
- Higher resolution output (up to 4K)
- Deeper semantic understanding of complex prompts
- Support for more reference images (up to 14)
- Better consistency in multi-turn editing sessions
- Integration with Google Search for real-time information
- Improved text rendering for detailed typography
The Pro version costs more per generation, so the decision comes down to whether your use case justifies the premium. For commercial production work requiring maximum quality, Pro makes sense. For prototyping, learning, and casual use, standard Nano Banana delivers excellent results at lower cost.
If you need Pro capabilities but want to manage costs, API access through third-party providers like laozhang.ai offers competitive pricing for both standard and Pro versions, with unified billing across multiple AI models.
Use Case Recommendations
Based on extensive testing, here are recommendations for which version suits common use cases:
Use Standard for:
- Social media content creation where slight imperfections are acceptable
- Rapid prototyping and concept exploration during creative brainstorming
- Learning and practicing prompt engineering techniques
- Generating variations to find the right direction before final production
- High-volume content creation where cost optimization matters
Use Pro for:
- Client-facing commercial work where every detail matters
- Complex multi-element scenes requiring coherent integration
- Text-heavy designs where typography must be pixel-perfect
- Projects requiring maximum resolution output
- Work where you need the model to understand nuanced, complex prompts
Hybrid Approach: Many professional creators use a hybrid workflow: rapid iteration with Standard to explore concepts and nail down the approach, then a final generation with Pro for production-quality output. This balances creativity exploration with cost efficiency.
Building Your Prompt Library
As you gain experience with Nano Banana, you'll develop prompts that work consistently for your use cases. Building a personal library of proven prompts accelerates future work and ensures consistency across projects.
Organize by Category
Structure your library around the types of images you generate most frequently. Common categories include:
- Portrait photography (headshots, environmental portraits, editorial)
- Product photography (e-commerce, lifestyle, detail shots)
- Character design (figurines, anime, realistic characters)
- Marketing assets (social media graphics, ads, banners)
- Editorial illustrations (blog headers, book covers, concept art)
For each category, save prompts that produced excellent results along with the actual output images. When you need something similar later, you have both reference and template.
Develop Modular Components
Rather than saving complete prompts only, develop reusable components that you can mix and match:
Lighting presets:
- "soft diffused lighting through sheer curtains"
- "dramatic side lighting with deep shadows, noir aesthetic"
- "bright studio lighting, clean and commercial"
Camera specifications:
- "Canon EOS R5, 85mm f/1.4, shallow depth of field"
- "wide-angle perspective, 24mm lens, slight barrel distortion"
- "macro shot, extreme close-up, tack-sharp details"
Style references:
- "clean minimalist aesthetic, lots of negative space"
- "rich and saturated editorial magazine style"
- "muted film photography tones, subtle grain"
Combine components with subject-specific details for new prompts.
Track What Works and What Doesn't
Keep notes on prompts that consistently produce good results versus those that require many regenerations. Over time, you'll identify patterns: certain phrasings that the model responds to well, combinations that produce unexpected results, and specifications that get ignored.
This empirical knowledge—what actually works rather than what should theoretically work—becomes your competitive advantage.
Learning from Community Resources
The Nano Banana community has produced excellent prompt resources worth exploring:
- nanoprompts.org maintains a collection of 109+ curated prompts across 9 categories, each tested and refined by the community
- Fotor's prompt gallery offers 40+ ready-to-use prompts with example outputs, useful for understanding what's possible
- GitHub awesome-nanobanana-pro is a community-maintained collection of advanced techniques and use cases
- Google's official blog posts provide tips directly from the model's creators, offering insight into intended usage patterns
Use these resources as learning tools rather than just copy-paste sources. Study the structure of effective prompts, understand why certain phrasings work, and adapt techniques to your specific needs. The goal is developing intuition for prompt construction, not memorizing formulas.
Establishing Your Personal Workflow
As you develop expertise, establish a consistent workflow that minimizes friction:
- Starting point: Always begin from a template in your library rather than a blank slate
- Quick iteration: Make 2-3 rapid generations to test the direction before refining
- Systematic refinement: Address one element at a time (lighting first, then composition, then details)
- Documentation: Save successful prompts with their outputs and notes about what worked
- Regular review: Periodically review your library to update techniques and remove outdated approaches
This systematic approach transforms prompt engineering from guesswork into a reliable, repeatable skill.
Conclusion: From Consumer to Creator
The difference between getting mediocre AI images and consistently stunning results comes down to understanding how to communicate with the model. Nano Banana is a remarkably capable tool, but like any tool, it performs best in skilled hands. The techniques in this guide—the 6-element framework, photography vocabulary, structured formatting, and iterative refinement—transform you from a prompt consumer copying examples to a prompt creator designing exactly what you need.
Start with the fundamentals: describe scenes rather than listing keywords. Use the 6-element framework to ensure your prompts address subject, composition, action, environment, style, and technical specifications. Think like a photographer when you want photorealistic results. Apply advanced techniques—Markdown formatting, ALL CAPS emphasis, hex colors, JSON structures—when standard approaches fall short.
Build your personal prompt library as you discover what works for your use cases. Track successful prompts alongside their outputs, develop modular components you can recombine, and maintain notes on patterns you observe. This accumulated knowledge compounds over time, making each project easier than the last.
The AI image generation landscape continues to evolve rapidly. New models appear, capabilities expand, and techniques that work today may need adjustment tomorrow. But the underlying principle remains constant: the more precisely you can articulate your vision, the more accurately any model can realize it. Master the fundamentals of effective prompting, and you'll adapt quickly to whatever comes next.