Complete Guide to 600x600 Pixel Passport Photos: Official Standards & AI Conversion [2025]
Master the official 600x600 pixel passport photo requirements for US passports, visas, and Green Cards. Learn AI-powered conversion techniques to ensure 100% compliance every time!

Nano Banana Pro
4K图像官方2折Google Gemini 3 Pro Image · AI图像生成
已服务 10万+ 开发者
Complete Guide to 600x600 Pixel Passport Photos: Official Standards & AI Conversion [2025]
{/* Cover image */}
When applying for a US passport, visa, or Green Card, submitting a photo that meets official specifications is crucial. According to the US Department of State, non-compliant photos are the leading cause of application rejections. This comprehensive guide breaks down all requirements for 600x600 pixel passport photos and introduces how AI technology can help you easily obtain fully compliant photos.
🔥 Verified June 2025: This guide provides the latest official standards and AI conversion methods to help you achieve 100% passport and visa photo approval! No professional photography equipment needed—create compliant photos right at home!
Complete Breakdown of 600x600 Pixel Passport Photo Requirements
The 600x600 pixel format is the standard digital dimension for passport and visa photos in the United States and several other countries. This specification applies not only to US passport applications but also to various visas, Green Cards, and student IDs. Understanding these precise requirements is essential for ensuring your application proceeds smoothly.
1. Basic Size Specifications: Digital vs. Print Standards
Passport photo requirements include specifications for both digital and printed versions:
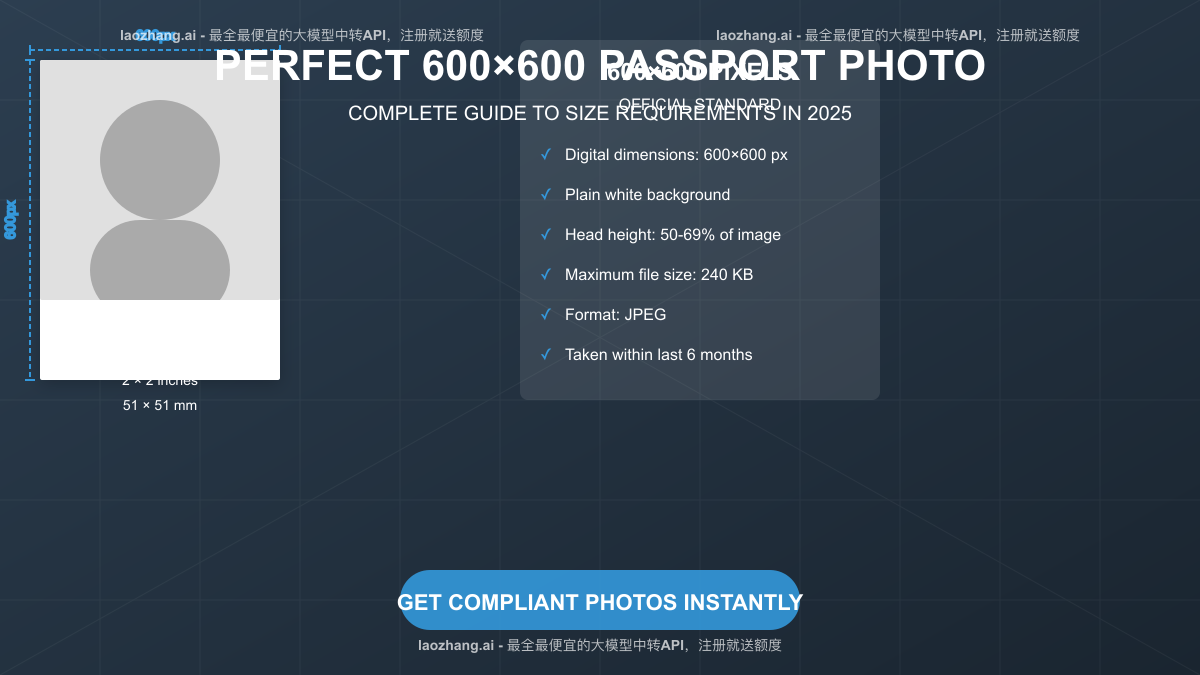
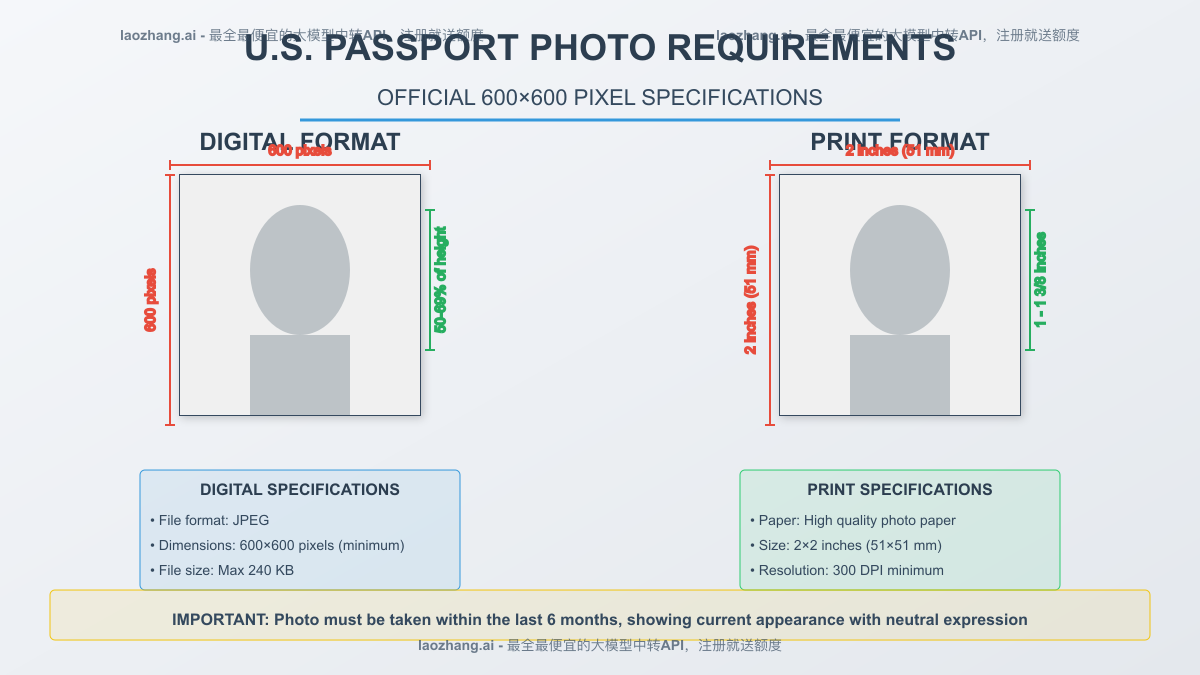
Digital Photo Specifications:
- Dimensions: 600x600 pixels (minimum) to 1200x1200 pixels (maximum)
- Aspect ratio: Square (width equals height)
- Resolution: At least 300 DPI
- File format: JPEG (.jpg)
- File size: Not exceeding 240 KB
Printed Photo Specifications:
- Dimensions: 2x2 inches (51x51 mm)
- Aspect ratio: Square
- Paper: High-quality photo paper (matte or glossy)
2. Head Size and Position Requirements
Precise control of head size and position is the most critical aspect of passport photo specifications:
- Head height: From bottom of chin to top of head (including hair) should be 50-69% of the photo's height
- Specific measurement: Head height should be 1-1⅜ inches (25-35 mm)
- Eye position: Eyes should be positioned 1⅛-1⅜ inches (28-35 mm) from the bottom of the photo
- Facial orientation: Face forward, looking directly at the camera, not tilted or turned to the side
💡 Professional tip: Head size proportion is a common reason for photo rejection. Both oversized and undersized head images will cause your application to be returned.
3. Background and Lighting Requirements
Background and lighting directly impact the professionalism and compliance of your photo:
- Background color: Plain white or off-white
- Background quality: Uniform, no patterns, no shadows
- Lighting requirements: Even illumination, avoiding overexposure or dark areas
- Shadow control: No visible shadows on face or background
- Contrast: Appropriate contrast between face and background, but not excessive
4. Facial Expression and Pose Standards
US passport photos have strict requirements for expression and pose:
- Expression requirements: Natural expression, slight smile permitted but no teeth showing
- Eye status: Both eyes open, looking directly at the camera
- Head position: Head centered, not tilted or turned to one side
- Facial visibility: Entire face must be clearly visible, not obscured by hair or accessories
5. Clothing and Accessories Regulations
Clothing and accessories must also meet specific requirements:
- Everyday attire: Wear normal daily clothing, no uniforms or camouflage patterns
- Headgear restrictions: No hats or head coverings unless for religious or medical reasons
- Eyeglasses rule: Eyeglasses not permitted (except with medical certification)
- Jewelry: Jewelry is acceptable but should not obscure the face or create glare
- Hearing devices: Hearing devices or similar articles may be worn if used daily
Which Documents Require 600x600 Pixel Photos?
The 600x600 pixel format is required for various official documents and identification cards, primarily including:
| Document Type | Country | Size Requirement | Unit |
|---|---|---|---|
| US Passport | USA | 600 x 600 | pixels |
| US Visa | USA | 600 x 600 | pixels |
| Green Card Application | USA | 600 x 600 | pixels |
| Student ID | USA | 600 x 600 | pixels |
| Indian Passport | India | 600 x 600 | pixels |
| Indian Visa | India | 600 x 600 | pixels |
| Diversity Visa Program (DV) | USA | 600 x 600 | pixels |
Different types of applications may have additional specific requirements:
US Passport Photos: Must be in color with a white background and taken within the last 6 months.
Visa Photos: Some visa categories may require digital photos to be uploaded with application forms DS-160 or DS-260.
Green Card Photos: Permanent resident card applications require the same 600x600 pixel standard but must be submitted through the USCIS online system.
Student ID Photos: Most US universities adopt the same 600x600 pixel standard but may have more relaxed expression requirements.
Practical Tips for Taking Compliant Passport Photos at Home
You don't need to visit a professional photography studio to take compliant passport photos. Here's how to create them at home using simple equipment:
1. Basic Equipment Setup
Successful compliant photo capture requires the following basic equipment:
- Smartphone or digital camera
- Even light source (natural light or soft artificial lighting)
- Plain white background (white wall or cloth)
- Tripod or stable support (optional)
2. Environment Setup Techniques
Creating an ideal shooting environment is crucial for obtaining high-quality photos:
- Choose a location with abundant natural light, such as near a window
- Avoid direct sunlight or harsh artificial lighting
- Ensure the background is completely flat, without wrinkles or patterns
- Maintain appropriate distance from the background to avoid casting shadows
3. Posing and Expression Guidance
Correct posture and expression are key to compliance:
- Stand or sit straight with relaxed shoulders
- Face the camera directly, avoiding tilting or turning to one side
- Maintain a natural expression, slight smile acceptable but no teeth showing
- Ensure both eyes are open and looking directly at the camera
- Take multiple photos to ensure at least one meets all requirements
4. Common Issues and Solutions
Problems you might encounter when taking passport photos at home and how to solve them:
- Background not white enough: Use a white sheet or purchase a portable backdrop
- Uneven lighting: Add light sources or use reflectors to balance lighting
- Shadow issues: Adjust distance from background or increase ambient lighting
- Incorrect photo dimensions: Use professional apps for cropping and adjustment
- Improper head proportion: Adjust shooting distance or use zoom function
Using AI Technology to Convert Regular Photos into Standard Passport Photos
Modern AI technology can easily transform ordinary photos into official-compliant passport photos without professional photography skills:

1. Advantages of AI Photo Conversion
Using AI technology to process passport photos offers several significant advantages:
- Automatic size adjustment: Precise cropping to 600x600 pixel standard
- Background processing: Automatic removal of existing background and replacement with regulation white background
- Lighting optimization: Adjustment of brightness, contrast, and color balance
- Facial optimization: Ensuring facial features are clearly visible
- Compliance verification: Automatic validation that photos meet official requirements
2. Conversion Process Explained
The process of converting photos using AI technology is remarkably simple:
- Upload original photo: Select a clear front-facing photo
- AI automatic processing: System automatically adjusts size, removes background, optimizes lighting
- Human verification: Professional review ensures the photo meets all official requirements
- Receive final product: Download digital version or order printed copies
🔍 Important note: Even when using AI technology, ensure the original photo is of good quality with clearly visible facial features, as this will significantly improve the quality of the final product.
3. AI Fixes for Common Photo Issues
AI technology can address multiple common photo problems:
- Unsuitable background: Automatic replacement with regulation-compliant plain white background
- Uneven lighting: Intelligent adjustment of brightness and contrast
- Eyeglasses glare: Reduction or elimination of lens reflections
- Shadow issues: Intelligent removal of facial and background shadows
- Improper head proportion: Automatic adjustment to standard proportions
4. Using API Services for Professional Support
For users needing batch processing or integration with existing systems, professional API services are worth considering:
- laozhang.ai API service: Provides the most comprehensive and economical large model transit API
- Automated processing: Batch process multiple photos while maintaining consistency
- High-precision recognition: Accurately identify facial features and make professional adjustments
- Instant verification: Real-time checking of photo compliance with official requirements
- Free trial credits: New users receive free credits upon registration
Common Reasons for Passport Photo Rejection and How to Avoid Them
Understanding common rejection reasons can help you avoid similar issues:
1. Technical Specification Non-Compliance
The most common technical issues and their solutions:
- Incorrect dimensions: Ensure digital photos are exactly 600x600 pixels
- Low resolution: Use high-quality cameras or smartphones, ensuring at least 300 DPI
- Wrong file format: Save photos only in JPEG format
- File too large: Appropriately compress photos, ensuring they don't exceed 240 KB
- Poor print quality: Use professional photo paper, avoid home printers
2. Background and Lighting Issues
Background and lighting are another category of common rejection reasons:
- Background not pure white: Use pure white backgrounds, avoiding gray or other colors
- Patterned or shadowed background: Ensure background is completely flat and texture-free
- Uneven lighting: Avoid side lighting, use uniform front lighting
- Facial shadows: Adjust light source positions to eliminate facial shadows
- Overexposure or underexposure: Appropriately adjust camera settings or post-processing
3. Improper Pose and Expression
Non-compliant poses and expressions can also lead to photo rejection:
- Tilted head: Ensure head is straight, not tilted or turned to one side
- Unnatural expression: Maintain a natural expression, avoiding exaggerated smiles or serious expressions
- Closed or squinting eyes: Ensure eyes are fully open and looking directly at the camera
- Face obscured: Ensure hair or accessories don't obscure any part of the face
- Gaze deviation: Look directly at the camera, avoid looking away
4. Inappropriate Clothing and Accessories
Inappropriate clothing and accessories are common issues:
- Wearing eyeglasses: Remove eyeglasses unless medically necessary
- Improper religious headwear position: Ensure headwear doesn't obscure facial contours
- Overly bright clothing: Choose neutral-toned everyday clothing
- Reflective accessories: Avoid wearing jewelry that creates strong reflections
- Inappropriate uniforms: Don't wear uniforms or military attire
Special Requirements for Baby and Child Passport Photos
Taking passport photos for babies and children involves special considerations:
1. Baby Passport Photo Regulations
Baby photos have some special exemptions and techniques:
- Relaxed expression requirements: Babies may have eyes partially or fully closed
- Mouth requirements: Mouth may be open, but pacifiers should not be used
- Support method: Baby seats can be used, but no other person should appear in the photo
- Background options: White sheets can be used as backgrounds
- Timing strategy: Choose times when the baby is calm or just after waking up
2. Child Passport Photo Tips
Practical advice for taking passport photos of older children:
- Attention grabbing: Use toys or sounds to attract the child's attention toward the camera
- Quick capture: Have equipment ready to take photos quickly
- Multiple attempts: Take multiple photos to ensure at least one meets requirements
- Shadow prevention: Ensure adequate lighting to avoid shadows
- Simple guidance: Use simple language to guide children into the correct pose
Frequently Asked Questions About 600x600 Pixel Passport Photos
Here are some common questions and answers about passport photos:
Q1: What size will a 600x600 pixel photo be when printed?
A1: A 600x600 pixel digital photo printed at 300 DPI resolution will be 2x2 inches (51x51 mm), which is the standard size for US passport photos.
Q2: Can I smile in my passport photo?
A2: Yes, you can smile, but it must be a closed-mouth smile with no teeth showing. The safest approach is to maintain a natural expression, neither overly smiling nor overly serious.
Q3: Do my ears need to be visible in my passport photo?
A3: US passport photo regulations do not require ears to be visible, but facial contours must be completely visible. If long hair covers your ears but doesn't obscure facial contours, this is acceptable.
Q4: Can I wear religious headwear in my passport photo?
A4: Yes, but you must provide a signed statement confirming that the headwear is a daily religious item. Additionally, the headwear should not obscure any part of your face or cast shadows.
Q5: Can digital photos be taken with a smartphone?
A5: Yes, as long as the photo is clear and meets all specification requirements. Modern smartphone cameras typically have sufficient quality to take acceptable passport photos.
Key Steps to Obtaining Perfect 600x600 Pixel Passport Photos
To successfully obtain passport photos that meet 600x600 pixel requirements, keep these key points in mind:
- Strictly follow size requirements: Ensure digital photos are 600x600 pixels and printed photos are 2x2 inches
- Control head proportion: Head height should be 50-69% of the photo's height
- Ensure pure white background: Use plain white backgrounds without texture, avoiding shadows
- Maintain correct posture: Face forward, natural expression, both eyes open
- Ensure even lighting: Avoid overexposure or shadows
- Consider using AI tools: Leverage modern technology to ensure photos meet all requirements
🌟 Final advice: When uncertain whether your photo meets requirements, using professional AI photo processing services is the safest choice and can significantly increase your application success rate!
We hope this guide helps you easily obtain compliant passport photos. If you have any questions or need additional information, please leave a comment below!
Update Log
plaintext┌─ Update Record ──────────────────────────┐ │ 2025-06-10: First publication of complete guide │ └────────────────────────────────────────┘